!! Oracle 12c Cluster: ACFS Leverages Flex ASM !!
NOTE : As with any code, ensure to test this script in a development environment before attempting to run it in production.
In Oracle Database Releases earlier than 12c, an Automatic Storage Management (ASM) instance runs on every node in the cluster, and ASM Cluster File System (ACFS) Service on a node connects to the local ASM instance running on the same host. If the ASM instance on a node were to fail, then the shared Disk Groups and hence ACFS file
In Oracle Database Releases earlier than 12c, an Automatic Storage Management (ASM) instance runs on every node in the cluster, and ASM Cluster File System (ACFS) Service on a node connects to the local ASM instance running on the same host. If the ASM instance on a node were to fail, then the shared Disk Groups and hence ACFS file systems can no longer be accessed on that node.
With introduction of Flex ASM in Oracle 12c, the hard dependency between ASM and its clients has been relaxed and a smaller number of ASM instances need run on a subset of servers in a cluster. In this scenario, when there might be nodes without an ASM instance, a new instance type has been introduced by Flex ASM – ASM proxy instance which gets metadata information from ASM instance on behalf of ACFS. If ASM instance is not available locally, ASM proxy instance connects to other ASM instances over the network to fetch the metadata. Moreover, if the local ASM instance fails, then ASM proxy instance can failover to another surviving ASM instance on a different server resulting in uninterrupted availability of shared storage and ACFS file systems. However, I/O to the underlying storage does not go through Oracle ASM, but goes directly through the Oracle ASM proxy instance. An ASM proxy instance must be running on a node which needs to provide ACFS service.
*. A new instance type has been introduced by Flex ASM – ASM proxy instance, which gets metadata information from ASM instance on behalf of ACFS.
*. If an ASM instance is not available locally, ASM proxy instance connects to other ASM instances over the network resulting in uninterrupted availability of shared storage and ACFS file systems.
*. This provides a much higher degree of flexibility, scalability and availability for file services to clients.
Figure 1 shows that as an ASM instance is not running on Hub Node 2, ADVM / ACFS services on Hub Node 2l utilize the ASM proxy instance (+APX2) to access the metadata from the remote ASM instance (+ASM1) running on Hub Node 1.
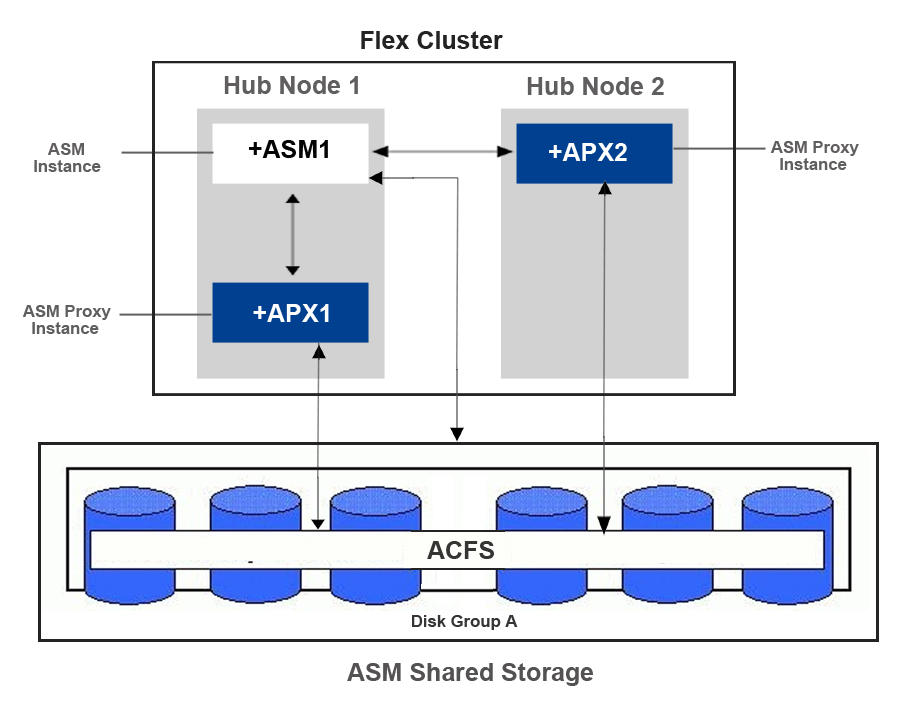
Figure 1.
Flex ASM can be configured on either a standard cluster or a Flex Cluster. When Flex ASM runs on a standard cluster, ASM services can run on a subset of cluster nodes servicing clients across the cluster. When Flex ASM runs on a Flex Cluster, ASM services can run on a subset of Hub Nodes servicing clients across all of the Hub Nodes in the Flex Cluster. Besides, in a flex cluster, only hub nodes can host the ACFS services because hub nodes have direct access to storage.
A Demonstration
To explore how ADVM / ACFS can leverage Flex ASM features, we will use an ASM Flex Cluster that is configured with two hub nodes (rac1 and rac2). Our first set of tasks is to create an ACFS file system resource.
Check Prerequisites
First, let’s verify that all kernel modules needed for ACFS and ADVM are loaded on both the nodes.
[root@rac1 ~]# lsmod |grep oracle
oracleacfs 2837904 1
oracleadvm 342512 1
oracleoks 409560 2 oracleacfs,oracleadvm
oracleasm 84136 1
[root@rac2 ~]# lsmod |grep oracle
oracleacfs 2837904 1
oracleadvm 342512 1
oracleoks 409560 2 oracleacfs,oracleadvm
oracleasm 84136 1
The ASM Dynamic Volume Manager (ADVM) proxy instance is a special Oracle instance which enables ADVM to connect to Flex ASM and is required to run on the same node as ADVM and ACFS. For a volume device to be visible on a node, an ASM proxy instance must be running on that node. Let’s verify that an ASM proxy instance is running on both the nodes.
[root@rac2 ~]# crsctl stat res ora.proxy_advm -t
----------------------------------------------------------------
Name Target State Server State details
----------------------------------------------------------------
Local Resources
----------------------------------------------------------------
ora.proxy_advm
ONLINE ONLINE rac1 STABLE
ONLINE ONLINE rac2 STABLE
Create the ADVM Volume
We’ll next modify the compatible.advm attribute of the DATA ASM disk group to enable all the new ASM Dynamic Volume (ADVM) features included in release 12.1, and then create a new volume – VOL1 within the DATA disk group with a volume size of 300 MB.
[grid@rac1 root]$ asmcmd setattr -G DATA compatible.advm 12.2.0.0.0
[grid@rac1 root]$ asmcmd volcreate -G DATA -s 300m VOL1
[grid@rac1 root]$ asmcmd volinfo -G DATA VOL1
Diskgroup Name: DATA
Volume Name: VOL1
Volume Device: /dev/asm/vol1-114
State: ENABLED
Size (MB): 320
Resize Unit (MB): 32
Redundancy: MIRROR
Stripe Columns: 4
Stripe Width (K): 128
Usage: ACFS
Mountpath:
Create ACFS File System and Corresponding Mount Point
Now let’s construct an ACFS file system on the newly-created volume VOL1 and also create a mount point on both the nodes to mount the ACFS file system.
[root@rac1 ~]# mkfs -t acfs /dev/asm/vol1-114
[root@rac1 ~]# mkdir -p /acfs1
[root@rac2 ~]# mkdir -p /acfs1
Configure Cloud File System Resource For ACFS File System
Now using the srvctl commands, we will create an Oracle Cloud File System resource on the volume device VOL1 with the mount point /acfs1:
[root@rac1 ~]# srvctl add filesystem -m /acfs1 -d /dev/asm/vol1-114
[root@rac1 ~]# srvctl status filesystem -d /dev/asm/vol1-114
ACFS file system //acfs2 is not mounted
[root@rac1 ~]# mount | grep vol1
[root@rac2 ~]# mount | grep vol1
We need to start the file system resource to mount the ACFS file system.
[root@rac1 ~]# srvctl start filesystem -d /dev/asm/vol1-114
[root@rac1 ~]# srvctl status filesystem -d /dev/asm/vol1-114
ACFS file system //acfs2 is mounted on nodes rac1,rac2
[root@rac1 ~]# mount | grep vol1
/dev/asm/vol1-114 on /acfs1 type acfs (rw)
[root@rac2 ~]# mount | grep vol1
/dev/asm/vol1-114 on /acfs1 type acfs (rw)
Verify The Cloud File System Resource
It can be verified that the new Cloud File System is indeed working properly as a small text file created on it from rac1 can be successfully accessed from rac2.
[root@rac1 ~]# echo "Test File on ACFS" > /acfs1/testfile.txt
[root@rac2 asm]# cat /acfs1/testfile.txt
Test File on ACFS
Leveraging Flex ASM
To demonstrate how ACFS / ADVM leverages these Flex ASM capabilities, let us first have a look at the current state of various cluster resources in our two node cluster.
View Baseline Status of Various Cluster Resources
It can be seen that currently:
An ASM instance is running on both the nodes
DATA disk group, volume VOL1 on DATA diskgroup and ACFS file system on VOL1 are all online on both the nodes.
[root@rac1 ~]# crsctl stat res ora.asm -t
----------------------------------------------------------------
Name Target State Server State details
----------------------------------------------------------------
Cluster Resources
----------------------------------------------------------------
ora.asm
1 ONLINE ONLINE rac1 STABLE
1 ONLINE ONLINE rac2 STABLE
----------------------------------------------------------------
[root@rac1 ~]# crsctl stat res ora.DATA.dg -t
----------------------------------------------------------------
Name Target State Server State details
----------------------------------------------------------------
Local Resources
----------------------------------------------------------------
ora.DATA.dg
ONLINE ONLINE rac1 STABLE
ONLINE ONLINE rac2 STABLE
----------------------------------------------------------------
[root@rac1 ~]# crsctl stat res ora.DATA.VOL1.advm -t
----------------------------------------------------------------
Name Target State Server State details
----------------------------------------------------------------
Local Resources
----------------------------------------------------------------
ora.DATA.VOL1.advm
ONLINE ONLINE rac1 Volume device /dev/a
sm/vol1-114 is
online,STABLE
ONLINE ONLINE rac2 Volume device /dev/a
sm/vol1-114 is
online,STABLE
[root@rac1 ~]# crsctl stat res ora.data.vol1.acfs
NAME=ora.data.vol1.acfs
TYPE=ora.acfs.type
TARGET=ONLINE , ONLINE
STATE=ONLINE on rac1, ONLINE on rac2
Confirm Flex ASM Proxy Instances
Let’s also verify that ASM proxy instances +APX1 running on rac1 and +APX2 running on rac2 are using ASM instances +ASM1 and +ASM2 running locally on their corresponding nodes.
SQL> col client_instance_name format a20
col asm_host_name for a20
SELECT DISTINCT
i.instance_name asm_instance_name,
i.host_name asm_host_name,
c.instance_name client_instance_name,
c.status
FROM gv$instance i, gv$asm_client c
WHERE i.inst_id = c.inst_id;
ASM_INSTANCE_NAM ASM_HOST_NAME CLIENT_INSTANCE_NAME STATUS
---------------- -------------------- -------------------- ------------
+ASM1 rac1.vbtech.com +APX1 CONNECTED
+ASM1 rac1.vbtech.com +ASM1 CONNECTED
+ASM2 rac2.vbtech.com +APX2 CONNECTED
To make ACFS / ADVM leverage Flex ASM capabilities, we can perform a simple test: On stopping the ASM instance on node rac2 we should observe that ACFS / ADVM services will continue to run on rac2 while utilizing an ASM proxy instance to satisfy metadata requests to a remote ASM instance – in this case, +ASM1 running on rac1.
Halt ASM Instance On rac2
Let’s halt ASM instance +ASM2 running on node rac2.
[root@rac1 ~]# srvctl stop asm -n rac2
PRCR-1014 : Failed to stop resource ora.asm
PRCR-1145 : Failed to stop resource ora.asm
CRS-2529: Unable to act on 'ora.asm' because that would require stopping or relocating 'ora.DATA.dg', but the force option was not specified
[root@rac1 ~]# srvctl stop asm -n rac2 -f
[root@rac1 ~]# srvctl status asm
ASM is running on rac1
Verify Availability of VOL1 On rac2
If we now check we’ll find that even though the +ASM2 instance and the DATA disk group are not available on rac2, volume VOL1 created on the DATA disk group is still mounted on rac2 because of Flex ASM. Node rac2 connects to the remote ASM instance +ASM1 running on rac1 using its ASM proxy instance +APX2 to access the metadata, and that keeps volume VOL1 online.
[root@rac1 ~]# crsctl stat res ora.asm -t
----------------------------------------------------------------
Name Target State Server State details
----------------------------------------------------------------
Cluster Resources
----------------------------------------------------------------
ora.asm
1 ONLINE ONLINE rac1 STABLE
2 ONLINE OFFLINE rac2 STABLE
----------------------------------------------------------------
[root@rac1 ~]# crsctl stat res ora.DATA.dg -t
----------------------------------------------------------------
Name Target State Server State details
----------------------------------------------------------------
Local Resources
----------------------------------------------------------------
ora.DATA.dg
ONLINE ONLINE rac1 STABLE
OFFLINE OFFLINE rac2 STABLE
----------------------------------------------------------------
[root@rac1 ~]# crsctl stat res ora.DATA.VOL1.advm -t
----------------------------------------------------------------
Name Target State Server State details
----------------------------------------------------------------
Local Resources
----------------------------------------------------------------
ora.DATA.VOL1.advm
ONLINE ONLINE rac1 Volume device /dev/a
sm/vol1-114 is
online,STABLE
ONLINE ONLINE rac2 Volume device /dev/a
sm/vol1-114 is
online,STABLE
Verify Availability of Cloud File System acfs1 On rac2
We can also verify that the file on cloud file system acfs1 is visible from both rac1 and rac2.
[root@rac1 acfs1]# cat /acfs1/testfile.txt
“Test File on ACFS”
[root@rac2 asm]# cat /acfs1/testfile.txt
“Test File on ACFS”
Confirm Flex ASM Proxy Instances
We can also verify that since ASM instance +ASM2 running on rac2 is no longer available, ACFS / ADVM leverages Flex ASM and ASM proxy instance +APX2 running on rac2 accesses the metadata from remote ASM instance +ASM1 that is running on rac1 to access volume VOL1 present on the DATA disk group.
SQL> col client_instance_name format a20
col asm_host_name for a20
SELECT DISTINCT
i.instance_name asm_instance_name,
i.host_name asm_host_name,
c.instance_name client_instance_name,
c.status
FROM gv$instance i, gv$asm_client c
WHERE i.inst_id = c.inst_id;
ASM_INSTANCE_NAM ASM_HOST_NAME CLIENT_INSTANCE_NAME STATUS
---------------- -------------------- -------------------- ------------
+ASM1 rac1.vbtech.com +APX1 CONNECTED
+ASM1 rac1.vbtech.com +ASM1 CONNECTED
+ASM1 rac1.vbtech.com +APX2 CONNECTED
NOTE : As with any code, ensure to test this script in a development environment before attempting to run it in production.
In Oracle Database Releases earlier than 12c, an Automatic Storage Management (ASM) instance runs on every node in the cluster, and ASM Cluster File System (ACFS) Service on a node connects to the local ASM instance running on the same host. If the ASM instance on a node were to fail, then the shared Disk Groups and hence ACFS file
In Oracle Database Releases earlier than 12c, an Automatic Storage Management (ASM) instance runs on every node in the cluster, and ASM Cluster File System (ACFS) Service on a node connects to the local ASM instance running on the same host. If the ASM instance on a node were to fail, then the shared Disk Groups and hence ACFS file systems can no longer be accessed on that node.
With introduction of Flex ASM in Oracle 12c, the hard dependency between ASM and its clients has been relaxed and a smaller number of ASM instances need run on a subset of servers in a cluster. In this scenario, when there might be nodes without an ASM instance, a new instance type has been introduced by Flex ASM – ASM proxy instance which gets metadata information from ASM instance on behalf of ACFS. If ASM instance is not available locally, ASM proxy instance connects to other ASM instances over the network to fetch the metadata. Moreover, if the local ASM instance fails, then ASM proxy instance can failover to another surviving ASM instance on a different server resulting in uninterrupted availability of shared storage and ACFS file systems. However, I/O to the underlying storage does not go through Oracle ASM, but goes directly through the Oracle ASM proxy instance. An ASM proxy instance must be running on a node which needs to provide ACFS service.
*. A new instance type has been introduced by Flex ASM – ASM proxy instance, which gets metadata information from ASM instance on behalf of ACFS.
*. If an ASM instance is not available locally, ASM proxy instance connects to other ASM instances over the network resulting in uninterrupted availability of shared storage and ACFS file systems.
*. This provides a much higher degree of flexibility, scalability and availability for file services to clients.
Figure 1 shows that as an ASM instance is not running on Hub Node 2, ADVM / ACFS services on Hub Node 2l utilize the ASM proxy instance (+APX2) to access the metadata from the remote ASM instance (+ASM1) running on Hub Node 1.
Figure 1.
Flex ASM can be configured on either a standard cluster or a Flex Cluster. When Flex ASM runs on a standard cluster, ASM services can run on a subset of cluster nodes servicing clients across the cluster. When Flex ASM runs on a Flex Cluster, ASM services can run on a subset of Hub Nodes servicing clients across all of the Hub Nodes in the Flex Cluster. Besides, in a flex cluster, only hub nodes can host the ACFS services because hub nodes have direct access to storage.
A Demonstration
To explore how ADVM / ACFS can leverage Flex ASM features, we will use an ASM Flex Cluster that is configured with two hub nodes (rac1 and rac2). Our first set of tasks is to create an ACFS file system resource.
Check Prerequisites
First, let’s verify that all kernel modules needed for ACFS and ADVM are loaded on both the nodes.
[root@rac1 ~]# lsmod |grep oracle
oracleacfs 2837904 1
oracleadvm 342512 1
oracleoks 409560 2 oracleacfs,oracleadvm
oracleasm 84136 1
[root@rac2 ~]# lsmod |grep oracle
oracleacfs 2837904 1
oracleadvm 342512 1
oracleoks 409560 2 oracleacfs,oracleadvm
oracleasm 84136 1
The ASM Dynamic Volume Manager (ADVM) proxy instance is a special Oracle instance which enables ADVM to connect to Flex ASM and is required to run on the same node as ADVM and ACFS. For a volume device to be visible on a node, an ASM proxy instance must be running on that node. Let’s verify that an ASM proxy instance is running on both the nodes.
[root@rac2 ~]# crsctl stat res ora.proxy_advm -t
----------------------------------------------------------------
Name Target State Server State details
----------------------------------------------------------------
Local Resources
----------------------------------------------------------------
ora.proxy_advm
ONLINE ONLINE rac1 STABLE
ONLINE ONLINE rac2 STABLE
Create the ADVM Volume
We’ll next modify the compatible.advm attribute of the DATA ASM disk group to enable all the new ASM Dynamic Volume (ADVM) features included in release 12.1, and then create a new volume – VOL1 within the DATA disk group with a volume size of 300 MB.
[grid@rac1 root]$ asmcmd setattr -G DATA compatible.advm 12.2.0.0.0
[grid@rac1 root]$ asmcmd volcreate -G DATA -s 300m VOL1
[grid@rac1 root]$ asmcmd volinfo -G DATA VOL1
Diskgroup Name: DATA
Volume Name: VOL1
Volume Device: /dev/asm/vol1-114
State: ENABLED
Size (MB): 320
Resize Unit (MB): 32
Redundancy: MIRROR
Stripe Columns: 4
Stripe Width (K): 128
Usage: ACFS
Mountpath:
Create ACFS File System and Corresponding Mount Point
Now let’s construct an ACFS file system on the newly-created volume VOL1 and also create a mount point on both the nodes to mount the ACFS file system.
[root@rac1 ~]# mkfs -t acfs /dev/asm/vol1-114
[root@rac1 ~]# mkdir -p /acfs1
[root@rac2 ~]# mkdir -p /acfs1
Configure Cloud File System Resource For ACFS File System
Now using the srvctl commands, we will create an Oracle Cloud File System resource on the volume device VOL1 with the mount point /acfs1:
[root@rac1 ~]# srvctl add filesystem -m /acfs1 -d /dev/asm/vol1-114
[root@rac1 ~]# srvctl status filesystem -d /dev/asm/vol1-114
ACFS file system //acfs2 is not mounted
[root@rac1 ~]# mount | grep vol1
[root@rac2 ~]# mount | grep vol1
We need to start the file system resource to mount the ACFS file system.
[root@rac1 ~]# srvctl start filesystem -d /dev/asm/vol1-114
[root@rac1 ~]# srvctl status filesystem -d /dev/asm/vol1-114
ACFS file system //acfs2 is mounted on nodes rac1,rac2
[root@rac1 ~]# mount | grep vol1
/dev/asm/vol1-114 on /acfs1 type acfs (rw)
[root@rac2 ~]# mount | grep vol1
/dev/asm/vol1-114 on /acfs1 type acfs (rw)
Verify The Cloud File System Resource
It can be verified that the new Cloud File System is indeed working properly as a small text file created on it from rac1 can be successfully accessed from rac2.
[root@rac1 ~]# echo "Test File on ACFS" > /acfs1/testfile.txt
[root@rac2 asm]# cat /acfs1/testfile.txt
Test File on ACFS
Leveraging Flex ASM
To demonstrate how ACFS / ADVM leverages these Flex ASM capabilities, let us first have a look at the current state of various cluster resources in our two node cluster.
View Baseline Status of Various Cluster Resources
It can be seen that currently:
An ASM instance is running on both the nodes
DATA disk group, volume VOL1 on DATA diskgroup and ACFS file system on VOL1 are all online on both the nodes.
[root@rac1 ~]# crsctl stat res ora.asm -t
----------------------------------------------------------------
Name Target State Server State details
----------------------------------------------------------------
Cluster Resources
----------------------------------------------------------------
ora.asm
1 ONLINE ONLINE rac1 STABLE
1 ONLINE ONLINE rac2 STABLE
----------------------------------------------------------------
[root@rac1 ~]# crsctl stat res ora.DATA.dg -t
----------------------------------------------------------------
Name Target State Server State details
----------------------------------------------------------------
Local Resources
----------------------------------------------------------------
ora.DATA.dg
ONLINE ONLINE rac1 STABLE
ONLINE ONLINE rac2 STABLE
----------------------------------------------------------------
[root@rac1 ~]# crsctl stat res ora.DATA.VOL1.advm -t
----------------------------------------------------------------
Name Target State Server State details
----------------------------------------------------------------
Local Resources
----------------------------------------------------------------
ora.DATA.VOL1.advm
ONLINE ONLINE rac1 Volume device /dev/a
sm/vol1-114 is
online,STABLE
ONLINE ONLINE rac2 Volume device /dev/a
sm/vol1-114 is
online,STABLE
[root@rac1 ~]# crsctl stat res ora.data.vol1.acfs
NAME=ora.data.vol1.acfs
TYPE=ora.acfs.type
TARGET=ONLINE , ONLINE
STATE=ONLINE on rac1, ONLINE on rac2
Confirm Flex ASM Proxy Instances
Let’s also verify that ASM proxy instances +APX1 running on rac1 and +APX2 running on rac2 are using ASM instances +ASM1 and +ASM2 running locally on their corresponding nodes.
SQL> col client_instance_name format a20
col asm_host_name for a20
SELECT DISTINCT
i.instance_name asm_instance_name,
i.host_name asm_host_name,
c.instance_name client_instance_name,
c.status
FROM gv$instance i, gv$asm_client c
WHERE i.inst_id = c.inst_id;
ASM_INSTANCE_NAM ASM_HOST_NAME CLIENT_INSTANCE_NAME STATUS
---------------- -------------------- -------------------- ------------
+ASM1 rac1.vbtech.com +APX1 CONNECTED
+ASM1 rac1.vbtech.com +ASM1 CONNECTED
+ASM2 rac2.vbtech.com +APX2 CONNECTED
To make ACFS / ADVM leverage Flex ASM capabilities, we can perform a simple test: On stopping the ASM instance on node rac2 we should observe that ACFS / ADVM services will continue to run on rac2 while utilizing an ASM proxy instance to satisfy metadata requests to a remote ASM instance – in this case, +ASM1 running on rac1.
Halt ASM Instance On rac2
Let’s halt ASM instance +ASM2 running on node rac2.
[root@rac1 ~]# srvctl stop asm -n rac2
PRCR-1014 : Failed to stop resource ora.asm
PRCR-1145 : Failed to stop resource ora.asm
CRS-2529: Unable to act on 'ora.asm' because that would require stopping or relocating 'ora.DATA.dg', but the force option was not specified
[root@rac1 ~]# srvctl stop asm -n rac2 -f
[root@rac1 ~]# srvctl status asm
ASM is running on rac1
Verify Availability of VOL1 On rac2
If we now check we’ll find that even though the +ASM2 instance and the DATA disk group are not available on rac2, volume VOL1 created on the DATA disk group is still mounted on rac2 because of Flex ASM. Node rac2 connects to the remote ASM instance +ASM1 running on rac1 using its ASM proxy instance +APX2 to access the metadata, and that keeps volume VOL1 online.
[root@rac1 ~]# crsctl stat res ora.asm -t
----------------------------------------------------------------
Name Target State Server State details
----------------------------------------------------------------
Cluster Resources
----------------------------------------------------------------
ora.asm
1 ONLINE ONLINE rac1 STABLE
2 ONLINE OFFLINE rac2 STABLE
----------------------------------------------------------------
[root@rac1 ~]# crsctl stat res ora.DATA.dg -t
----------------------------------------------------------------
Name Target State Server State details
----------------------------------------------------------------
Local Resources
----------------------------------------------------------------
ora.DATA.dg
ONLINE ONLINE rac1 STABLE
OFFLINE OFFLINE rac2 STABLE
----------------------------------------------------------------
[root@rac1 ~]# crsctl stat res ora.DATA.VOL1.advm -t
----------------------------------------------------------------
Name Target State Server State details
----------------------------------------------------------------
Local Resources
----------------------------------------------------------------
ora.DATA.VOL1.advm
ONLINE ONLINE rac1 Volume device /dev/a
sm/vol1-114 is
online,STABLE
ONLINE ONLINE rac2 Volume device /dev/a
sm/vol1-114 is
online,STABLE
Verify Availability of Cloud File System acfs1 On rac2
We can also verify that the file on cloud file system acfs1 is visible from both rac1 and rac2.
[root@rac1 acfs1]# cat /acfs1/testfile.txt
“Test File on ACFS”
[root@rac2 asm]# cat /acfs1/testfile.txt
“Test File on ACFS”
Confirm Flex ASM Proxy Instances
We can also verify that since ASM instance +ASM2 running on rac2 is no longer available, ACFS / ADVM leverages Flex ASM and ASM proxy instance +APX2 running on rac2 accesses the metadata from remote ASM instance +ASM1 that is running on rac1 to access volume VOL1 present on the DATA disk group.
SQL> col client_instance_name format a20
col asm_host_name for a20
SELECT DISTINCT
i.instance_name asm_instance_name,
i.host_name asm_host_name,
c.instance_name client_instance_name,
c.status
FROM gv$instance i, gv$asm_client c
WHERE i.inst_id = c.inst_id;
ASM_INSTANCE_NAM ASM_HOST_NAME CLIENT_INSTANCE_NAME STATUS
---------------- -------------------- -------------------- ------------
+ASM1 rac1.vbtech.com +APX1 CONNECTED
+ASM1 rac1.vbtech.com +ASM1 CONNECTED
+ASM1 rac1.vbtech.com +APX2 CONNECTED